how to install u part wig

Looking to master the U-Part Wig trend? Follow along as we share a step-by-step tutorial on how to install a U-Part Wig the right way.
STEP #1: MEASURE YOUR HEAD
To kick things off, you’ll need to place the U-Part Wig over your head. This step will let you know how much hair you need to part for a seamless look.
STEP #2: PART YOUR HAIR
Next, part your natural hair using a rattail comb. Then part your hair at your crown to match the U-Part Wig shape. Be sure to also part about an inch-wide section from your hairline to the ear. Clip this hair out of the way. This will come in handy when you’re ready to style your hair.
STEP #3: CREATE YOUR FOUNDATION
Now that your hair part is in good shape, it’s time to get your remaining hair as flat as possible so your wig can lay evenly. Kick things off by creating small braids or cornrows. Working with short strands? No problem… we got you! Simply smooth your mane with a bit of hair gel to keep your strands smooth and in place.
STEP #4: WIG IT OUT
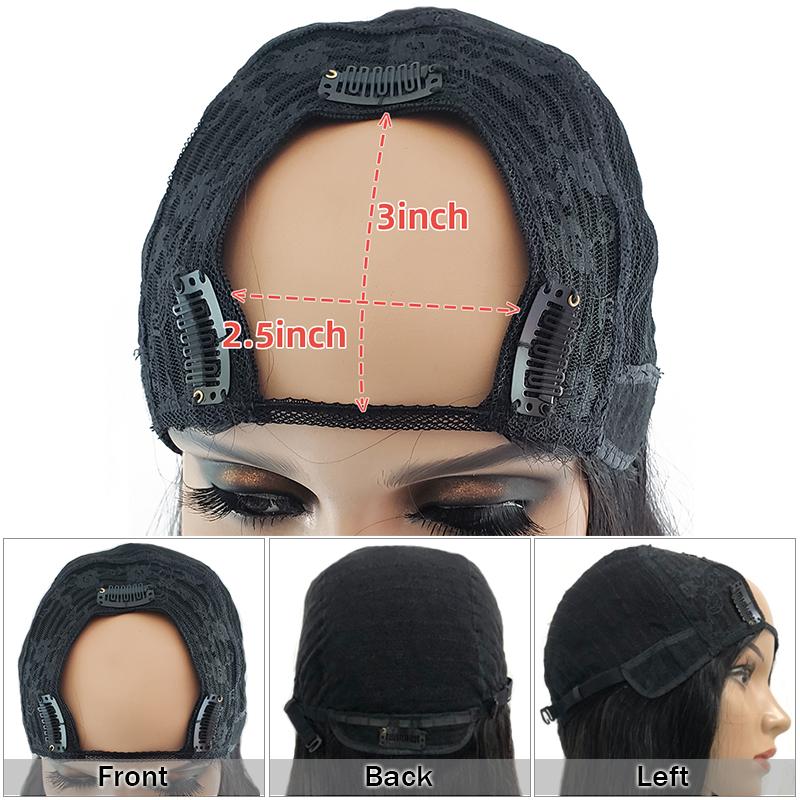
Holding the U-Part Wig at both sides, place the wig over your head and snap the clips in place to cover your braids. There should be clips along the perimeter of your U-Part Wig to ensure a seamless fit. As a result, your U-Part Wig should lay flat on your head with your hair part clipped in place.
STEP #5: ADJUST YOUR WIG
As we mentioned above, U-Part Wigs typically come equipped with an adjustable strap and clips to give you the best possible fit. If you find that you need more support, simply place the strap over your head to secure your wig. This helps to reduce the risk of the wig sliding on your head.
STEP #6: MASK THE HAIR EXTENSIONS
Your U-Part Wig look is almost complete! Now that your wig is firmly in place, you need to disguise the hair extensions on your wig. Release your hair part along the sides and the crown of your head. Comb through with a wide-tooth comb for a gorgeous finish.

HOW TO CARE FOR A U-PART WIG
Just like other wig styles, U-Part Wigs can cost a pretty penny. So, it’s essential to keep your wig in mint condition to get the most out of the style. Consider adding our five tips below to your U-Part Wig hair care routine.
1. HANDLE YOUR U-PART WIG WITH CARE
It’s always smart to hold your U-Part Wig gently by the edges. Since this wig is made with a sheer mesh underneath, excessive pulling or tugging can ruin the shape and overall look of your wig.
2. WASH AND CONDITION YOUR WIG
If your wig is made of human hair, it’s essential to wash and condition it with a moisturizing hair care system. Try She’s Happy Hair Shampoo and Conditioner, which is a sulfate-free system that works to nourish hair extensions with moisture and leave you with a luminous shine. The system is also good for your natural hair as well.
3. DETANGLE WITH A WIDE TOOTH COMB
If you want your U-part wig to maintain its fresh look, it’s essential to always use a wide-tooth comb during the detangling process. This is the best way to preserve your wig and smooth tangles, knots, and matted hair without too much fuss
4. PUT YOUR BLOW DRYER ON ICE
While you may be tempted to reach for a blow-dryer, we advise against it. Excessive heat can take a toll on your wig. Instead, allow your strands to air dry to keep your wig in tip-top shape.
5. MAKE HEAT PROTECTANT YOUR Bestie
Depending on the texture of your U-part wig, you may need to rely on heat styling tools to blend your natural hair with your wig perfectly. Before you reach for any hot tools, you’ll want to spritz and spray your wig and your natural hair, generously with a heat protectant. The She’s Happy Hair Moroccan Argan Oil works to seal in shine, and protect hair from heat.